Archery Blog
Archery for Beginners: Complete Starter Guide
Sep
Target Archery : A Comprehensive Guide to Getting Started
Are you new to target archery and eager to embark on a journey of precision and focus? Is that too strong of a question? OK. Let me calm down. This comprehensive guide is designed to help novice archers like you (maybe) navigate the fundamentals of target archery. From choosing the right equipment to mastering basic techniques, we’ll cover everything you need to know to kick-start your target archery adventure.
- Understanding Target Archery:

What is target archery?
Target archery is a discipline of archery that involves shooting arrows at a specific target, typically consisting of concentric circles and a bullseye. The goal in target archery is to score points by hitting the center of the target, which is the bullseye, with the highest point value, and outer rings with decreasing point values.
Largely popularized by its presence in the Olympic games, archery became a part of the Olympic Games in the early 20th century. It made its Olympic debut in 1900, was excluded for a period, and then reintroduced as a permanent sport in 1972
Key aspects of target archery include:
- Distance: Archers shoot from standardized distances known as “ranges.” The distance varies depending on the archer’s age, gender, and the specific competition rules. Common distances for target archery include 18 meters (indoor) and 30, 50, 70, or 90 meters (outdoor).
- Equipment: Target archers use specialized equipment, including recurve bows, compound bows, and arrows designed for precision and accuracy. The use of sights, stabilizers, and other accessories is common to enhance accuracy.
- Scoring: The target is divided into multiple concentric rings, with the bullseye in the center. Each ring has a designated point value, with the bullseye typically worth the highest number of points. Arrows are scored based on where they land on the target.
- Competitions: Target archery is a popular sport and competitive discipline. It is included in events such as the Olympic Games, World Archery Championships, and various national and international tournaments. Archers may compete individually or as part of teams.
- Rules and Regulations: Target archery competitions follow specific rules and regulations set by organizations like World Archery. These rules govern equipment specifications, shooting procedures, and scoring methods to ensure fairness and consistency.
- Recreational and Club Activities: Target archery is not limited to competitive archers. Many people practice it as a recreational activity or participate in archery clubs to enjoy the sport and improve their skills. It’s a great way to focus on precision and discipline. Archery clubs also have the benefit of being a place where archers can meet, learn more about the craft and socialize with other enthusiasts.
Target archery requires a high level of skill, concentration, and consistency in shooting. Archers aim to achieve the highest score possible by consistently hitting the bullseye and inner rings. Whether practiced as a competitive sport or a leisurely activity, target archery offers a challenging and rewarding experience for participants of all skill levels.
Brief history and evolution of target archery
Target archery has a rich history that spans thousands of years and has evolved significantly over time. Here is a brief overview of its history and evolution:
Ancient Origins:
- Target archery is one of the oldest forms of archery, with its origins dating back to ancient civilizations. It was used for hunting and warfare, and archers often practiced their skills by shooting at targets.
Medieval Europe:
- In medieval Europe, archery became an essential skill for both hunting and military purposes. Archery contests, often held as entertainment during festivals, played a role in developing target archery.
The Royal Toxophilite Society:
- In 1781, the Royal Toxophilite Society was founded in England, marking one of the earliest formal archery organizations. It aimed to promote archery as a sport and established standardized rules and target distances.
Victorian Revival:
- The 19th century saw a resurgence of interest in archery as a recreational activity. Archery clubs were established, and the sport gained popularity among the upper classes. The use of the longbow and the recurve bow was prevalent during this period.
Modernization and Olympic Inclusion:
- In the early 20th century, archery underwent significant modernization with the introduction of the compound bow, sight systems, and other technical advancements. In 1931, the Federation Internationale de Tir a l’Arc (FITA), now known as World Archery, was formed to oversee international archery competitions. Archery was included in the Olympic Games in 1900 but was removed and then reinstated in 1972. This marked a significant milestone for target archery as it gained global recognition.
Equipment Advancements:
- The development of modern compound bows, carbon-fiber arrows, and high-tech accessories has further enhanced the accuracy and performance of archers. These innovations have made archery more accessible to a wider range of people.

Paralympic Archery:
- Target archery has also been adapted for individuals with disabilities, leading to the inclusion of para-archery in the Paralympic Games.
Globalization and Participation:
- Target archery has grown as a global sport, with athletes and competitions held in various countries around the world. Archery has gained popularity in schools, clubs, and recreational settings, attracting participants of all ages and skill levels.
Technological Advances:
- In recent years, advancements in equipment, such as precision sights, stabilizers, and improved materials, have continued to push the boundaries of accuracy and performance in target archery.
Today, target archery remains a widely practiced sport and recreational activity, enjoyed by millions of people worldwide. Its evolution, from a survival skill to a highly specialized sport, showcases the enduring appeal of precision and accuracy in archery. The sport continues to thrive, with ongoing efforts to make it more inclusive and accessible to people of all backgrounds and abilities.
Equipment used in target archery: bows, arrows, and accessories
Target archery requires specialized equipment designed for precision and accuracy. Here is an overview of the key equipment used in target archery:
1. Bows:
- Recurve Bows: Recurve bows are the most common choice for target archery. They have limbs that curve away from the archer when unstrung, which stores energy for a powerful shot. Recurves are known for their accuracy and are used in Olympic archery.
- Compound Bows: Compound bows feature a system of cables and pulleys that provide mechanical advantage, making them easier to hold at full draw. They are known for their consistent accuracy and are popular in competitive archery.
- Longbows: Longbows have a simple, straight design and are often preferred by traditional archers for their elegance and historical significance. While less common in target archery competitions, some archers choose longbows for their personal style.
2. Arrows:
- Aluminum Arrows: These arrows are lightweight and highly accurate. They are commonly used in target archery due to their consistency and durability.
- Carbon Arrows: Carbon arrows are lightweight and known for their speed and accuracy. They are favored by many competitive archers.
- Wooden Arrows: Wooden arrows are popular among traditional archers for their classic look and feel. They require careful maintenance but are appreciated for their aesthetics and performance.
- Arrow Components: Arrows are equipped with nocks (the part that attaches to the bowstring), fletching (feathers or vanes for stabilization), and tips or points (the front end that hits the target). These components can be customized for optimal performance.

3. Accessories:
- Bow Sight: A bow sight is an accessory that helps archers aim more precisely by providing a visual reference point. It consists of pins or other sighting mechanisms.
- Stabilizers: Stabilizers are weight rods attached to the bow to reduce vibration and improve balance. They help archers hold the bow steady during the shot.
- Bow Release: A bow release aid is used by compound bow archers to release the bowstring with precision, reducing string torque and improving consistency.
- Quiver: A quiver holds arrows for easy access during shooting. It can be attached to the bow or worn on the archer’s body.
- Finger Tab or Glove: Archers use finger tabs or gloves to protect their fingers from the bowstring and ensure a smooth release.
- Arm Guard: An arm guard protects the forearm from the bowstring during the release, preventing painful string slap.
- Peep Sight: Often used in compound bows, a peep sight is a small aperture that aligns with the bow sight, providing a consistent reference point for aiming.
- String Silencers: These accessories reduce bowstring noise and vibration, helping archers maintain focus and minimize disturbance to the target.
Bow Case: A bow case provides protection and transportation for the bow and its accessories.
Bow Stand: A bow stand holds the bow upright when not in use, keeping it off the ground and preventing damage.
These are the primary pieces of equipment used in target archery. Archers often personalize their gear to match their shooting style, preferences, and skill level. The right combination of equipment can significantly impact an archer’s accuracy and consistency on the target range.

Getting Started
Selecting the right bow for a novice archer is essential for an enjoyable and successful archery experience. Novice archers should start with equipment that is easy to use, forgiving, and appropriate for their physical capabilities. Here are some key considerations when choosing a bow for a novice archer:
1. Bow Type:
- Recurve Bow: Recurve bows are an excellent choice for beginners. They are versatile, relatively easy to learn with, and widely available. Novice archers can start with a simple takedown recurve bow that allows for easy disassembly and transportation.
- Compound Bow: While compound bows can be suitable for beginners, they often come with more complex mechanisms and accessories. Some novices may prefer compounds, but they may require additional guidance on setup and maintenance.
- Youth or Beginner Bows: Manufacturers often produce bows specifically designed for beginners or young archers. These bows typically have lower draw weights and are more forgiving, making them a good choice for those just starting.
2. Draw Weight:
- Novice archers should begin with a relatively low draw weight that they can comfortably handle. The appropriate draw weight depends on the archer’s physical strength and age. Starting with a lighter draw weight (e.g., 15-20 pounds for youths, 20-30 pounds for adults) allows beginners to focus on proper form and technique without straining.
3. Bow Length:
- The length of the bow should match the archer’s draw length (the distance the archer pulls the string). A longer bow generally offers more stability and is forgiving of minor form mistakes.
4. Right-Handed or Left-Handed:
- Ensure the bow is suitable for the archer’s dominant hand (right or left-handed). It’s essential to choose the correct hand orientation to facilitate consistent shooting.
5. Adjustable Features:
- Some bows, particularly youth and beginner models, come with adjustable features like draw length and draw weight. These bows can “grow” with the archer and are a good investment for novice archers who may experience changes in physical strength or growth.
6. Accessory Compatibility:
- Consider whether the bow is compatible with accessories like sights, stabilizers, and arrow rests, as the archer may want to upgrade or add these later for improved accuracy. Be aware that ordering a mix of components may result in a bow setup that doesn’t work well. Archery stores can be a good place to get your bow. Experts can help select compatible parts to build a well working bow

7. Budget:
- Set a reasonable budget for the bow and necessary accessories, such as arrows, finger tabs, and arm guards. Keep in mind that quality and safety should not be compromised, even for novice equipment.
8. Try Before You Buy:
- Whenever possible, try out different bows at a local archery range or pro shop. This hands-on experience can help the novice archer find a bow that feels comfortable and suits their shooting style.
9. Seek Guidance:
- If you’re uncertain about choosing the right bow, consider seeking advice from experienced archers, instructors, or archery pro shops. They can provide valuable insights and recommend suitable options for novice archers. Again, being able to lay hands on a bow and get a feel for itcan give you an idea of the type and weight of bow you may like. Seeking expert help in purchasing parts of a bow that are compatible is very valuable for a novice.
Remember that archery is a sport that rewards patience and practice. As novice archers gain experience and confidence, they can consider upgrading to more advanced equipment that matches their evolving skills and goals.
Understanding draw weight and draw length
Understanding draw weight and draw length is crucial for archery beginners as these two factors have a significant impact on your archery experience. Let’s break down each concept:
1. Draw Weight:
- Definition: Draw weight refers to the amount of force or pounds (lbs) required to draw (pull back) the bowstring to a specified distance, usually 28 inches, which is a standard measurement in archery. It indicates how “heavy” or “hard to pull” the bow is.
- Importance for Beginners: Choosing the right draw weight is essential because it affects your ability to shoot accurately and comfortably. For beginners, it’s recommended to start with a lower draw weight that you can easily handle. A draw weight that is too high can lead to poor form and fatigue, which can negatively impact your shooting experience.
- Selecting the Appropriate Draw Weight: To determine the suitable draw weight for you:
- Consider your physical strength and ability. If you’re unsure, err on the side of a lighter draw weight.
- Seek guidance from an experienced archery instructor or pro shop staff. They can assess your strength and recommend an appropriate draw weight.
- Many youth and beginner bows are available in lower draw weights (e.g., 15-30 lbs) to accommodate novice archers.
2. Draw Length:
- Definition: Draw length is the distance between the bowstring at full draw and the grip of the bow. It is measured in inches and is an essential factor for consistent shooting. It is largely a function of height and arm length.
- Importance for Beginners: Knowing your draw length is essential because it helps ensure that your bow is appropriately sized for you. Shooting with the correct draw length enhances your accuracy and comfort while minimizing the risk of injury.
- Determining Your Draw Length: There are several methods to determine your draw length, including:
- Using the “wingspan” method: Stand with your arms extended sideways, and have someone measure the distance from fingertip to fingertip. Then, divide that measurement by 2.5 to get an approximate draw length.
- Consulting an archery pro shop or instructor who can measure your draw length using specialized tools.
3. Matching Bow to Draw Length and Weight:
- Once you know your draw length and have an idea of your suitable draw weight, it’s important to select a bow that matches these measurements. Bows come with specific draw length and weight ranges, so choose one that suits your needs.
- An archery professional can help you select the right bow that matches your draw length and weight requirements.
Starting with an appropriate draw weight and ensuring your bow matches your draw length will make your archery experience more enjoyable, comfortable, and safe. It’s always a good idea to seek guidance from experienced archers or instructors to ensure you choose the right equipment for your skill level and physical characteristics.

Choosing arrows and determining the appropriate spine
Selecting the right arrows and determining the appropriate spine is essential for beginners in archery. Arrow spine, which refers to the stiffness of the arrow’s shaft, plays a crucial role in achieving accuracy and consistency when shooting. Here’s a guide on how to choose arrows and find the right spine for novice archers:
1. Arrow Material:
Arrows are typically made from three primary materials: wood, aluminum, and carbon. For beginners, carbon arrows are often recommended for their durability, consistency, and forgiveness. They are less affected by changes in humidity and temperature compared to wooden arrows and are more affordable than premium aluminum arrows.
Selecting the right arrowheads in archery is crucial for beginners aiming for accuracy and performance. The choice of arrowheads depends on factors like the type of archery you’re pursuing (target, hunting, or recreational), your bow’s draw weight, and your personal shooting style. For beginners, it’s recommended to start with field or target points, as they offer good balance and accuracy. As you gain experience and determine your specific archery goals, you can explore specialized arrowhead types like broadheads for hunting or more advanced target points. Consulting with experienced archers or a knowledgeable archery shop can provide valuable guidance in making the right arrowhead selection for your needs and skill level.
2. Arrow Length:
Correct arrow length is essential to ensure proper arrow clearance and safety. To determine the right arrow length:
- Measure your draw length, which is the distance from your bow hand’s grip point to the nock point on the bowstring when at full draw.
- Add approximately 1-2 inches to your measured draw length to determine the arrow length you need. This extra length accommodates variations in your anchor point and helps prevent the arrow from falling off the arrow rest when drawn.
- It is better to have arrows that are too long than too short. Longer arrows will stay mounted on the bow when the string is drawn back.
- Another advantage of longer arrows is that if arrows hit hard objects and break or crack near the tip, the damaged section can be cut off without causing the arrow to now be too short.
3. Arrow Spine:
Arrow spine refers to the stiffness or flexibility of an arrow shaft. Choosing the correct arrow spine is critical for accuracy and consistency. The appropriate arrow spine depends on several factors:
- Draw Weight: Consider your bow’s draw weight, which should match your physical strength and experience level. The higher the draw weight, the stiffer the arrow spine should be.
- Draw Length: Longer draw lengths may require stiffer arrows to maintain accuracy and prevent excessive bending.
- Arrow Point Weight: Heavier arrow points (field points or broadheads) require stiffer arrows, while lighter points work better with less stiff arrows.
- Arrow Material: Different arrow materials (wood, aluminum, carbon) have different spine charts. Be sure to use the chart corresponding to your chosen arrow material.
4. Arrow Spine Chart:
Most arrow manufacturers provide spine charts that help you match your bow’s specifications to the right arrow spine. These charts typically consider draw weight, draw length, and arrow point weight to recommend the appropriate arrow spine. Archery pro shops and retailers can also assist in selecting the right arrows based on your bow setup. (Example below)

5. Shooting and Tuning:
After selecting arrows with the recommended spine, it’s important to shoot and tune your bow. Pay attention to arrow flight, consistency, and grouping. If your arrows consistently fly erratically or do not group well, you may need to adjust your arrow spine. Work with an experienced archer or instructor to fine-tune your setup.
6. Budget Considerations:
As a beginner, you may want to start with mid-range arrows that offer good quality without breaking the bank. As you gain experience and improve your skills, you can consider investing in higher-quality arrows tailored to your specific needs.
Choosing the right arrows is crucial for beginners in archery. Starting with carbon arrows of the correct length and spine, based on your bow’s specifications and your physical attributes, will set you on the path to success in archery. Always seek guidance from experienced archers or archery professionals when in doubt, as they can provide valuable insights and assistance in selecting and tuning your arrows.
Necessary safety precautions and equipment
Safety is paramount in archery, and beginners should adhere to essential safety precautions and use appropriate equipment to ensure a safe and enjoyable archery experience. Here are the necessary safety precautions and equipment for archery beginners:

Safety Precautions:
- Range Safety Rules: Whether you’re shooting at a formal archery range or in your backyard, always follow the established safety rules and guidelines specific to that location. Listen to range officers and experienced archers for guidance.
- Proper Training: Seek professional instruction or guidance from an experienced archer or certified instructor. Learning proper form, techniques, and safety procedures from the start is essential.
- Know Your Equipment: Understand how your bow and arrows work, including their parts, functions, and limitations. Read the manufacturer’s instructions and guidelines thoroughly.
- Inspect Equipment: Regularly inspect your bow, arrows, and accessories for damage or wear. Pay close attention to the bowstring, limbs, arrow nocks, and fletching. Replace or repair any damaged components promptly.
- Use a Suitable Bow: Choose a bow with an appropriate draw weight for your strength and experience level. Starting with a lower draw weight is safer for beginners.
- Warm-Up and Stretch: Prior to shooting, warm up your muscles and perform stretching exercises to prevent strains or injuries.
- Safe Draw and Release: Always keep the bow pointed downrange, and only draw the bowstring when the arrow is pointed towards the target. Use a consistent and controlled release technique.
- No Dry Firing: Never release the bowstring without an arrow nocked. Dry firing a bow (shooting without an arrow) can damage the bow and pose safety risks.
- Keep Hands Clear: Keep your bow hand and fingers clear of the bowstring’s path when drawing and releasing the arrow.
- Follow Range Commands: If you are shooting on a formal range, pay attention to range commands and cease shooting when instructed.
- Arrow Retrieval: After shooting, wait for a signal or permission to retrieve arrows. Do not walk to the target until it is safe to do so.
Safety Equipment:
- Archery Arm Guard: This protective gear covers your forearm and prevents string slap or contact with the bowstring.
- Finger Tab or Glove: A finger tab or glove protects your drawing hand’s fingers from friction and discomfort caused by the bowstring.
- Eye Protection: Safety glasses or protective eyewear can shield your eyes from flying debris and accidental contact with the bowstring or arrow fletchings.
- Closed-Toe Shoes: When shooting, wear closed-toe shoes with proper arch support for stability.
- Target Backstop: Ensure you have a suitable target backstop, such as a foam or straw target, to stop arrows safely.
By following these safety precautions and using the recommended safety equipment, archery beginners can minimize the risk of accidents and injuries while enjoying the sport responsibly. Always prioritize safety and maintain awareness of your surroundings and actions on the archery range or practice area.
Basic Archery Techniques:

Proper archery stance and posture
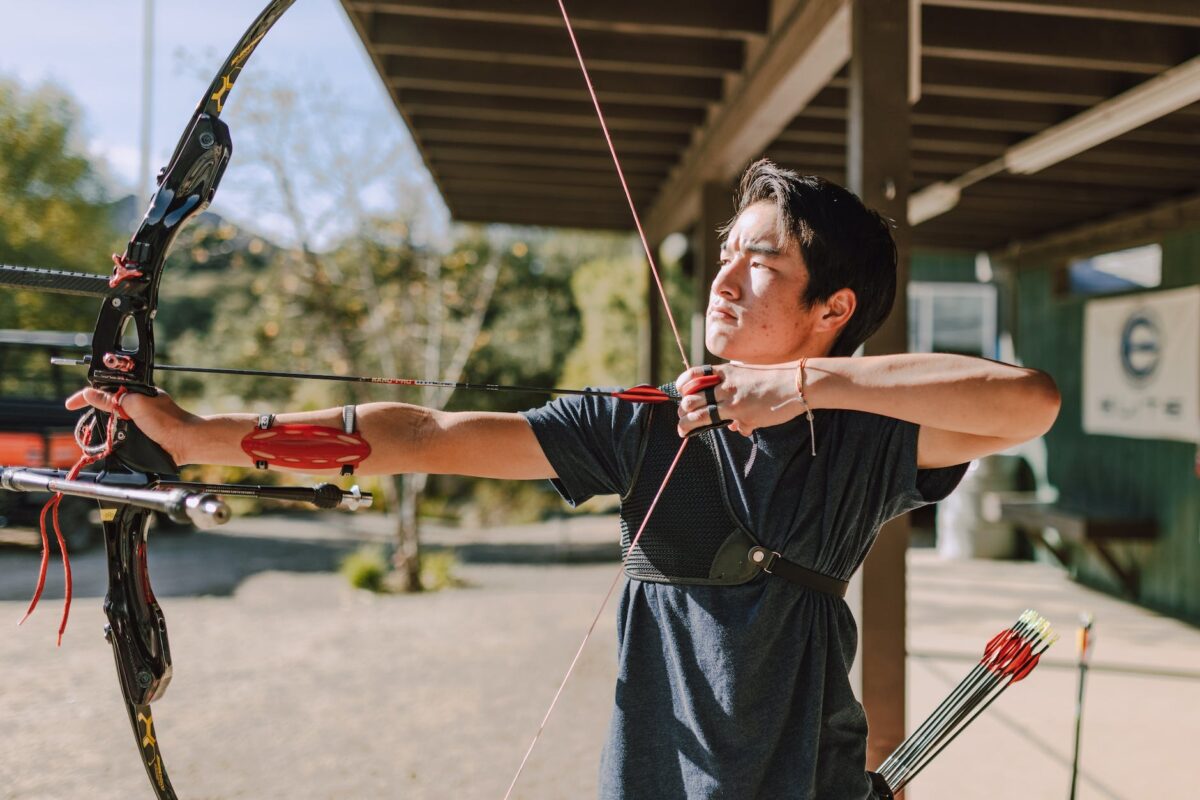
Proper archery stance and posture are fundamental for accuracy, consistency, and safety in archery. Whether you’re a beginner or an experienced archer, mastering the correct stance and posture is essential. Here’s a step-by-step guide to achieving the right archery stance and posture:
1. Standing Position – square stance:
- Stand perpendicular to the target with your feet shoulder-width apart. Your feet should be in line with each other, forming a straight line perpendicular to the target.
2. Foot Position – open stance:
- For a right-handed archer (drawing with the right hand), place your left foot slightly forward. The toes of your left foot should be slightly pointed toward the target at 45 degrees or less. For a left-handed archer, reverse the position.
3. Weight Distribution:
- Distribute your weight evenly between both feet. Avoid leaning forward or backward, as this can affect balance and accuracy.
4. Body Position:
- Stand tall with your spine straight, shoulders relaxed, and chest open. Avoid slouching or leaning to either side.
5. Head and Neck Position:
- Keep your head upright and in line with your body. Your gaze should be focused on the target. Avoid tilting your head to one side.
6. Hand Placement:
- Hold the bow handle with a relaxed grip using your bow hand (the one that does not draw the string). Your fingers should wrap around the grip without any tension or excessive pressure.
7. Bow Arm:
- Extend your bow arm fully toward the target without locking the elbow joint. Keep your bow arm relaxed but stable.
8. Drawing Arm:
- Your drawing arm (the one that draws the bowstring) should be extended straight out from your shoulder. The elbow of your drawing arm should be slightly higher than the shoulder.
9. Bowstring Hand Placement:
- Place your drawing hand’s fingers (typically the index, middle, and ring fingers) on the bowstring. Use a consistent anchor point on your face, such as the corner of your mouth or the tip of your nose, to maintain accuracy.
10. Torso Rotation:
- Slightly rotate your upper body, so your chest is perpendicular to the target. This rotation allows for proper alignment with the target and enhances your draw and follow-through.
11. Bow Tilt:
- Your bow should be perpendicular to the ground, with no noticeable tilt in any direction. Ensure that it is level, both horizontally and vertically.
12. Maintain Balance:
- Maintain a sense of balance throughout your body. You should feel stable and able to hold your position comfortably without wobbling or swaying.
13. Relaxation and Breath Control:
- Keep your muscles relaxed, especially your bow hand and drawing hand. Practice controlled breathing to help manage tension and maintain focus.
14. Consistency:
- Strive to maintain the same stance and posture with each shot, as consistency is crucial for accuracy in archery.
15. Again, Seek Guidance:
- Consider working with an experienced archery instructor who can provide personalized guidance and adjustments to your stance and posture based on your shooting style and body type.
Remember that achieving the proper archery stance and posture may take time and practice. Regularly practicing and fine-tuning your form will help you become a more accurate and consistent archer.
Nocking an arrow and gripping the bow
Nocking an arrow and gripping the bow are two fundamental aspects of archery that beginners must learn and master for safe and accurate shooting. Here are step-by-step instructions for nocking an arrow and gripping the bow as a beginner:
Nocking an Arrow:
- Prepare Your Arrows:
- Make sure your arrows are in good condition, with no cracks or damage.
- Ensure that the fletchings (feathers or vanes) are in proper alignment.
2. Select an Arrow:
- Choose an arrow that matches the draw length and draw weight of your bow. You can find this information on the arrow’s shaft or packaging.
3. Inspect the Nock:
- Examine the nock (the small plastic or metal piece at the end of the arrow) to ensure it is undamaged and securely attached to the arrow shaft.
4. Mount the Nock onto the Bowstring:
- Place the arrow’s nock onto the bowstring. Make sure the nock is fully seated against the bowstring.
5. Nocking Point:
- Use a nocking point or other reference point on the bowstring to ensure consistent arrow placement. The nocking point helps maintain arrow alignment and accuracy.
6. Fletched Arrow Orientation:
- If your arrows have fletchings, ensure that one fletching (the “cock feather” usually a different color) is oriented away from the bow, perpendicular to the bowstring. The other two fletchings should lie flat against the arrow shaft.

- Bow Hand Position:
- Hold the bow handle (grip) with your non-dominant hand (the hand that does not draw the string). Your palm should face the target.
2. Relaxed Grip:
- Use a relaxed and open hand to hold the bow handle. Your fingers should lightly wrap around the grip without excessive tension.
3. Fingers and Thumb Placement:
- Your fingers should be positioned below the grip, and your thumb should be placed lightly behind the grip, not wrapped around it. Avoid squeezing the bow tightly, as this can affect your accuracy.
4. Firmness and Stability:
- While your grip should be relaxed, it should also provide stability. Ensure that the bow does not wobble or twist in your hand during the shot.
5. Avoid Torque:
- Do not apply any torque or twisting force to the bow handle, as this can cause erratic arrow flight. Maintain a neutral grip.
6. Consistency:
- Strive for consistency in your bow grip with each shot. Maintaining the same grip pressure and hand placement helps with accuracy and repeatability.
7. Grip Check:
- Periodically check your grip during practice sessions to ensure it remains relaxed and stable. Avoid any sudden or excessive grip changes during the shot sequence.
8. Seek Guidance:
- If possible, seek guidance from an experienced archery instructor or coach to help you fine-tune your grip and ensure it aligns with your shooting style and bow setup.
Remember that practicing proper nocking and gripping techniques is crucial for developing good archery form. Over time, these skills will become second nature, leading to more accurate and consistent shooting.
Aiming techniques and utilizing sights
Aiming in archery can be done with or without utilizing sights, depending on the type of bow and archery discipline. Here are aiming techniques for both scenarios:
Aiming with Sights:
- Barebow and Recurve Sights:
- For barebow and recurve bows, archers often use simple sights that consist of a front sight (usually a pin or bead) and a rear sight (a notch or reference point on the bow riser). The goal is to align the front and rear sights with the target.
- Center the target in your field of view. Focus on the target, not the bow or sights.
- Ensure the front sight is centered in the rear sight notch or aligns with a reference point on the bow.
- Keep both eyes open for better depth perception.
- Release the arrow when the sight picture is steady and the front sight is on the target.
2. Compound Bow Sights:
- Compound bows often come equipped with multi-pin sights or single-pin sights. These provide adjustable aiming points for different distances.
- Adjust the sight pins to match the distance to the target.
- Center the appropriate pin on the target while maintaining proper form.
- Ensure your peep sight (if used) aligns with the sight housing and pins for consistent accuracy.
- Focus on the target and the chosen pin for the shot.

Aiming without Sights:
3. Instinctive Shooting:
- Instinctive shooting is a method where the archer relies on muscle memory and practice to estimate the correct aim point without using sights.
- Develop a consistent anchor point by placing your drawing hand at the same spot on your face for each shot (e.g., corner of the mouth or tip of the nose).
- Focus on the target, not the bow or arrow.
- With practice, you will learn to judge the correct arrow trajectory and point of impact based on visual cues and instinct.
4. Gap Shooting:
- Gap shooting involves using the gap between the target and a fixed reference point on the bow (e.g., the arrow tip) to estimate the aim point.
- Create a reference point on your bow, such as marking the arrow or using a reference point on the bow riser.
- Align this reference point with the desired impact point on the target.
- Adjust the gap between the reference point and the target based on the distance and trajectory needed for accurate shooting.
5. String Walking:
- String walking is a technique used in barebow recurve shooting where the archer changes the hand placement on the bowstring to adjust for different distances.
- Lowering your hand on the bowstring increases arrow trajectory, while raising it lowers the trajectory.
- Experiment and practice to find the right hand placement for various distances.
Aiming techniques vary among archers, and the choice between using sights or shooting instinctively often comes down to personal preference and the archer’s chosen discipline. Many archers find success with both methods, and it’s essential to practice and fine-tune your chosen aiming technique to improve accuracy over time.
Executing the release and following through
Executing the release and following through are crucial steps in archery that can greatly affect your accuracy and consistency. Here’s a step-by-step guide for archery beginners on how to execute a proper release and follow through:
Executing the Release:
- Maintain Consistent Anchor Point: Before releasing the arrow, ensure you have a consistent anchor point, which is where your drawing hand comes to rest on your face. Common anchor points include the corner of the mouth or the tip of the nose.
- Focus on the Target: Keep your gaze on the target, not on the bow or the arrow. Concentrate on the spot where you want the arrow to hit.
- Smooth and Controlled Release: The release should be smooth and controlled. Avoid any jerky or abrupt movements. Sudden releases can negatively impact your shot’s accuracy.
- Back Tension and Expansion: To execute a proper release, use back tension and expansion. This involves gradually increasing the tension in your back muscles as you draw the bow and expanding your chest slightly. Your drawing hand should continue moving backward as if you’re trying to pull the bowstring away from the bow. This technique promotes a clean and consistent release.
- Trigger Release (Compound Bows): If you’re using a compound bow with a release aid, apply gentle and steady pressure to the trigger. Avoid punching or jerking the trigger. Smoothly squeeze the trigger to release the bowstring.
- Fingers Release (Recurve and Traditional Bows): If you’re shooting a recurve or traditional bow with your fingers on the string, maintain a relaxed grip on the bowstring. Your fingers should open naturally as you continue pulling, allowing the bowstring to slip away from them without interference.

Following Through:
- Maintain Bow Arm Position: After releasing the arrow, your bow arm (the arm holding the bow) should remain extended and stable. Avoid dropping or lowering the bow immediately.
- Continue Aiming: Keep your focus on the target even after the arrow has been released. This helps maintain follow-through and consistency in your shot.
- Complete the Shot: Think of the shot as a continuous motion. Do not stop abruptly after the release. The entire process, from drawing to follow-through, should be a fluid and seamless movement.
- Hold the Stance: Maintain your shooting stance and posture until the arrow has hit the target. Let the bowstring and bow come to rest naturally.
- Evaluate the Shot: Pay attention to the arrow’s flight and where it hits the target. This post-shot analysis can help you make adjustments for future shots.
- Stay Relaxed: Avoid tensing up or collapsing your shooting form immediately after the release. Staying relaxed and following through enhances your shot’s consistency.
Remember that consistent practice is essential for improving your release and follow-through. Focus on these techniques during every shot, and with time and practice, you’ll develop a smoother and more controlled release, leading to greater accuracy in archery. If possible, seek guidance from an experienced archery instructor who can provide personalized feedback and tips for improvement.
Target Archery Practice:
- Establishing a practice routine
Establishing a practice routine as an archery beginner is essential for developing your skills, building consistency, and improving your accuracy over time. Here’s a step-by-step guide to help you create an effective practice routine:
1. Set Clear Goals:
Before you begin, define your archery goals. Are you aiming to improve your accuracy, increase your draw weight, or become proficient in a specific style of archery (e.g., target, 3D, or field archery)? Setting clear goals will guide your practice routine and help you track your progress.
2. Determine Practice Frequency:
Decide how often you’ll practice archery. Regular practice is key to improvement. Starting with 2-3 practice sessions per week is a good baseline for beginners.
3. Allocate Practice Time:
Plan the duration of each practice session. As a beginner, it’s better to have shorter, focused sessions (20-30 minutes) rather than long, tiring ones. Gradually increase practice time as your stamina and skills improve.
4. Warm-Up:
Begin each practice session with a warm-up routine to prepare your body and muscles. Simple stretching exercises and light bow drills can help prevent injuries.
5. Focus on Fundamentals:
Dedicate a portion of each practice session to working on fundamental archery skills, such as stance, posture, grip, draw, and release. Spend time honing these basics to build a strong foundation.
6. Drills and Exercises:
Incorporate various drills and exercises to target specific aspects of your shooting. These may include:
- Target Shooting: Aim for consistent groupings on the target face.
- Blank Bale Shooting: Practice form and shot execution without a target.
- 3D Archery: If you have access to 3D targets, simulate hunting scenarios for realism.
- Distance Shooting: Gradually increase your shooting distance to challenge your accuracy.
7. Record Your Progress:
Keep a log or journal of your practice sessions. Record your scores, the number of arrows shot, and any observations or notes about your form or technique. Tracking your progress can be motivating and informative.
8. Seek Feedback:
If possible, seek feedback from experienced archers, instructors, or coaches. They can provide valuable insights and correct any errors in your form or technique.
9. Mental Training:
Include mental training in your routine. Focus on your mental state, concentration, and visualization techniques. Archery is as much a mental game as a physical one.
10. Equipment Maintenance:
Regularly inspect and maintain your equipment. Make sure your bow and arrows are in good working condition. Clean and lubricate your equipment as needed.
11. Cool Down:
After each practice session, take a few minutes to cool down and stretch to prevent muscle soreness and promote recovery.
12. Rest and Recovery:
Give your body time to rest and recover between practice sessions. Overtraining can lead to fatigue and diminished performance.
13. Stay Consistent:
Consistency is key in archery. Stick to your practice routine, even when you experience plateaus or challenges. Improvement often comes in waves.
14. Gradual Progression:
As you gain experience and confidence, gradually increase the difficulty of your practice routines. This can include shooting longer distances, introducing new types of targets, or experimenting with different styles of archery.
Remember that patience and persistence are crucial in archery. Improvement takes time, so stay dedicated to your practice routine and enjoy the journey of becoming a skilled archer.
- Developing consistency and accuracy.
Developing consistency and accuracy in archery as a beginner is a gradual process that requires focused practice and attention to detail. Here are specific steps and tips to help you enhance your consistency and accuracy in archery:
1. Start with the Fundamentals:
- Begin by mastering the fundamental aspects of archery, such as your stance, posture, grip, draw, release, and follow-through. Consistent form is the foundation of accuracy.
2. Maintain a Consistent Anchor Point:
- Ensure that your anchor point (the point where your drawing hand touches your face) is the same for every shot. Consistency in anchor point helps achieve consistent arrow placement.
3. Focus on Your Breathing:
- Develop a consistent breathing pattern. Many archers take a deep breath before drawing the bow and exhale slowly as they release the arrow. Steady breathing can reduce anxiety and improve your shot process.
4. Work on Aiming Techniques:
- Practice your aiming techniques, whether you use sights or shoot instinctively. Consistent aiming is essential for accuracy.
5. Follow Through:
- Pay attention to your follow-through after releasing the arrow. Keep your bow arm extended, maintain your stance, and continue focusing on the target. A good follow-through helps ensure a consistent shot.
6. Establish a Routine:
- Develop a consistent pre-shot routine that includes steps like nocking the arrow, drawing the bow, and aiming. Following a routine can help reduce variations in your shots.
7. Record and Analyze Your Shots:
- Use a training diary or record your practice sessions on video. Review your shots to identify any consistent errors in form or technique that need correction.
8. Focus on Mental Training:
- Train your mind to stay calm and focused under pressure. Visualization, meditation, and mental cues can help you maintain mental consistency.
9. Practice Regularly:
- Consistent practice is essential for improvement. Dedicate time to archery on a regular basis to build muscle memory and refine your skills.
10. Set Achievable Goals:
- Establish realistic goals for your accuracy and consistency. Break down your goals into smaller, achievable milestones to track your progress.
11. Seek Feedback:
- Don’t hesitate to ask for feedback from experienced archers, coaches, or instructors. They can offer insights and tips to help you improve your form and technique.
12. Experiment and Learn:
- Be open to trying different arrows, bow setups, and techniques. Experimenting can help you find what works best for your shooting style.
13. Train with Variety:
- Incorporate various types of archery training into your routine, including target shooting, 3D archery, and distance shooting. Training diversity can improve adaptability and overall performance.
14. Practice Patience:
- Understand that consistency and accuracy in archery take time to develop. Be patient with yourself and stay committed to your training.
15. Stay Relaxed:
- Tension in your muscles can negatively impact your accuracy. Focus on staying relaxed during your shot process, especially in your bow hand and fingers.
Remember that consistency and accuracy in archery are skills that improve over time with dedication and practice. Be persistent in your efforts, and you will see progress in your shooting ability.
- Understanding scoring and competition formats
Understanding scoring and competition formats in archery is essential for both participants and spectators. Archery competitions can take various forms, from traditional target archery to 3D archery and field archery. Here’s an overview of scoring and common competition formats in archery:
Scoring in Archery:
In archery, scoring is based on the placement of arrows on the target face. The primary factors influencing scoring include the target face’s size and distance, the type of bow used (compound, recurve, or traditional), and the specific competition rules. Here are some key points to understand about scoring:
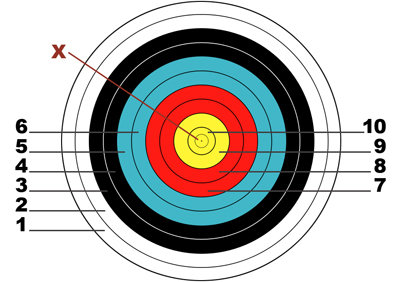
- Target Faces: Archery target faces are divided into multiple rings, with a central bullseye or gold zone. The bullseye typically awards the highest points, while outer rings offer fewer points. The size and number of rings vary depending on the competition.
- Scoring Zones: Arrows are assigned points based on which scoring zone they hit. The highest-scoring area is often called the “10-ring” or “X-ring,” and the point values decrease as you move away from the center.
- Distance and Rounds: Archery competitions can be held at various distances, ranging from short indoor distances (e.g., 18 meters) to longer outdoor distances (e.g., 70 meters for Olympic-style target archery). The number of arrows shot in each round can also vary.
- Ends and Sets: Competitions are divided into ends or sets, with archers shooting a specific number of arrows in each. For example, in Olympic-style target archery, archers shoot six arrows per end.
- Cumulative and Set Scoring: Some archery competitions use cumulative scoring, where points are added up after each end to determine the final score. Others use set scoring, where archers compete to win sets, and the first to a certain number of sets or points wins the match.
Common Competition Formats:
- Olympic-Style Target Archery:
- Target: Standard 10-ring target face.
- Distance: Varies depending on age and gender, with 70 meters for adult men and 70 meters or 60 meters for adult women.
- Scoring: Cumulative scoring with a set number of ends and arrows per end.
- Format: Individual and team competitions.

2. 3D Archery:
- Target: Life-sized animal-shaped foam targets.
- Distance: Varies depending on the target’s size and difficulty.
- Scoring: Typically uses a 10-8-5 system for the outer scoring zones.
- Format: Shooters move through a course with various 3D targets.
4. Field Archery:
- Target: Various paper targets set at unmarked distances in a natural setting.
- Distance: Targets are set at known or unknown distances.
- Scoring: Uses a multi-ring scoring system similar to target archery.
- Format: Archers navigate a course, shooting at targets from various distances and terrains.
5. Indoor Archery:
- Target: 10-ring target face at shorter distances (e.g., 18 meters).
- Distance: Indoor competitions are typically held at shorter distances.
- Scoring: Cumulative scoring, with a set number of arrows per end.
- Format: Individual and team competitions, often held during the winter months.
6. Para-Archery:
- Target: Similar to Olympic-style target archery but adapted for archers with disabilities.
- Distance: Varies depending on the archer’s classification and ability.
- Scoring: Follows standard archery scoring rules, adjusted for classification and adaptations.
It’s important to check the specific rules and scoring systems for the type of archery competition you are interested in, as they can vary significantly. Understanding the scoring and competition format is essential for both participating and enjoying archery events as a spectator.

Tips for improving your aim and shot placement.
Improving your aim and shot placement in archery is a gradual process that requires practice, patience, and attention to detail. Here are some valuable tips specifically tailored to archery beginners to help enhance their aim and shot placement:
1. Master the Fundamentals:
- Begin by mastering the fundamental aspects of archery, including your stance, posture, grip, draw, release, and follow-through. Consistent form is the foundation of accuracy.
2. Establish a Consistent Anchor Point:
- Ensure that your anchor point (the point where your drawing hand touches your face) is the same for every shot. Consistency in anchor point leads to consistent arrow placement.
3. Focus on Aiming Techniques:
- If you use sights, practice your aiming techniques diligently. Ensure that your sight pins are properly adjusted for the distance to the target, and maintain a steady aim on the target’s center.
4. Concentrate on Breathing:
- Develop a consistent and controlled breathing pattern. Many archers take a deep breath before drawing the bow and exhale slowly as they release the arrow. Steady breathing can help reduce anxiety and improve shot placement.
5. Use Visualization:
- Visualize the shot in your mind before executing it. Imagine the arrow’s trajectory and its path to the target. Visualization can enhance your mental preparation.
6. Work on Mental Focus:
- Maintain strong mental focus during your shot process. Block out distractions and stay in the moment. Concentrate on your aiming point.
7. Consistent Draw and Release:
- Ensure a smooth and controlled draw and release. Avoid any jerky or abrupt movements. A consistent release is crucial for shot placement.
8. Practice Regularly:
- Consistent practice is essential for improving your aim and shot placement. Dedicate time to archery on a regular basis to build muscle memory and refine your skills.
9. Set Specific Goals:
- Establish specific and achievable goals for your accuracy and shot placement. Break down your goals into smaller, measurable milestones to track your progress.
10. Record Your Shots:
- Keep a training diary or record your practice sessions on video. Review your shots to identify patterns, strengths, and areas that need improvement.11. Seek Feedback:
- Don't hesitate to ask for feedback from experienced archers, coaches, or instructors. They can provide valuable insights and tips to help you improve your form and technique.12. Experiment and Learn:
- Be open to trying different arrows, bow setups, and techniques. Experimenting can help you find what works best for your shooting style.13. Train with Variety:
- Incorporate various types of archery training into your routine, including target shooting, 3D archery, and field archery. Training diversity can improve adaptability and overall performance.14. Stay Relaxed:
- Tension in your muscles can negatively impact your aim. Focus on staying relaxed during your shot process, especially in your bow hand and fingers.15. Patience and Persistence:
- Understand that improving your aim and shot placement in archery takes time and consistent effort. Be patient with yourself and stay committed to your training.Remember that archery is a skill that improves with practice and dedication. Keep refining your technique, stay positive, and enjoy the journey of becoming a more accurate and proficient archer.
Common Mistakes to Avoid:
- Overcoming target panic.
Overcoming target panic in archery can be a challenging but achievable goal with the right approach and mindset. Target panic is a common issue where archers experience anxiety, tension, or involuntary flinching when aiming at the target, which can greatly affect accuracy. Here are some tips to help you overcome target panic:
1. Recognize and Accept Target Panic:
- The first step is acknowledging that you are experiencing target panic. Recognize that it’s a common issue among archers and not something to be ashamed of.
2. Seek Professional Guidance:
- Consider working with a qualified archery coach or instructor who has experience dealing with target panic. They can provide personalized guidance, exercises, and drills to help you overcome it.
3. Gradual Shot Process:
- Break down your shot process into smaller, manageable steps. Focus on each step separately, such as your draw, anchor, aim, and release. Practicing each step individually can help reduce anxiety.
4. Blank Bale Shooting:
- Practice shooting into a blank target or a large, blank backdrop without aiming at a specific point. This can help you regain confidence in your shot execution without the pressure of hitting a target.
5. Expand Your Comfort Zone:
- Gradually increase the distance to the target or the size of the target face as you practice. Start with a distance that allows you to shoot comfortably without experiencing panic and then work your way up.
6. Introduce Surprise Shots:
- Have someone else load your arrow or use a blindfold to make the shot feel less predictable. This can help break the anticipation associated with target panic.
7. Controlled Release Training:
- Work on a controlled and relaxed release of the bowstring. Avoid flinching or “punching” the trigger or releasing the string suddenly. A smooth release can help reduce panic.
8. Mental Training:
- Engage in mental training exercises such as meditation, visualization, and relaxation techniques. These can help you stay calm and focused during your shots.
9. Positive Self-Talk:
- Replace negative thoughts and doubts with positive self-talk. Remind yourself of your training and skills, and focus on the process rather than the outcome.
10. Patience and Persistence:
- Overcoming target panic may take time and effort. Be patient with yourself and stay persistent in your practice and training.11. Seek Support from Fellow Archers:
- Talk to other archers who have overcome target panic or who are dealing with similar issues. Sharing experiences and strategies can be encouraging and helpful.12. Use Target Panic Aids:
- Some archers find relief from target panic by using aids like a clicker or back tension release aids. Consult with an experienced archery coach to determine if these aids are suitable for you.Remember that overcoming target panic is a process, and it’s normal to have setbacks along the way. Stay committed to your training and seek professional guidance if needed. With time and practice, you can regain confidence in your shooting and improve your accuracy.
- Addressing issues with grip and anchor points.
Addressing issues with grip and anchor points in archery is crucial for achieving consistent accuracy and shot placement. Here are some tips to help archery beginners improve their grip and anchor points:
1. Grip:
- Relaxed Hand: Hold the bow grip with a relaxed and open hand. Avoid gripping it too tightly, as this can introduce tension and affect your shot.
- Consistent Grip Pressure: Maintain a consistent grip pressure throughout the shot process. Some archers use the “open V” technique, where the bow rests in the web between the thumb and index finger, with the other fingers lightly touching the grip.
- Avoid Torque: Ensure that your grip does not introduce torque or twisting of the bow. Torque can cause your arrows to go off-target. Keep your wrist in a neutral position.
- Experiment: Try different grip styles to find what feels most comfortable and natural for you. Experimenting with grip can help you identify the best fit for your shooting style.
2. Anchor Points:
- Consistency is Key: Anchor points are critical for consistent accuracy. Identify anchor points that work for you and strive to maintain them consistently for every shot.
- Index Finger Anchor: Many archers use the corner of their mouth or the tip of their nose as anchor points. Choose anchor points that suit your comfort and style.
- String Contact: Ensure that your string hand consistently contacts your face at the chosen anchor points. This contact helps with consistency in draw length and aim.
- Feel the Anchor: Focus on the sensation of your anchor points rather than visual confirmation. Feeling the anchor can improve consistency even in low-light conditions.
- **Use a Sight: If you use a sight on your bow, align the sight pins with your target while maintaining your anchor points. A well-aligned sight can significantly improve accuracy.
3. Seek Professional Guidance:
- Consider working with an experienced archery coach or instructor to address grip and anchor point issues. They can provide personalized guidance and adjustments to optimize your shooting form.
4. Record Your Shots:
- Use video recording to analyze your shots. This can help you identify inconsistencies in your grip and anchor points. Review the footage and make necessary adjustments.
5. Dry-Fire Practice:
- Practice your grip and anchor points without actually shooting arrows. Draw your bow, anchor, and hold your form without releasing an arrow. This can help reinforce muscle memory and consistency.
6. Mental Focus:
- Concentrate on your grip and anchor points during your shot process. Maintaining mental awareness of these key elements can help prevent deviations.
7. Consistent Training:
- Regularly practice your grip and anchor points. Consistency in training is vital for building muscle memory and reinforcing good habits.
8. Patience:
- Addressing grip and anchor point issues may take time and patience. Be persistent in your efforts and remain dedicated to improving your form.
Remember that addressing grip and anchor point issues is a continuous process in archery. Focus on building and maintaining good habits to achieve greater consistency and accuracy in your shooting.
- Correcting form and body alignment errors
Correcting form and body alignment errors in archery is essential for improving accuracy and consistency. Proper form is crucial to consistently hit your target. Here are some common form and body alignment errors in archery and tips on how to correct them:
1. Stance:
- Error: A stance that is too wide or too narrow can affect balance and stability.
- Correction: Maintain a shoulder-width stance with your feet parallel to the shooting line. Your weight should be evenly distributed between both feet.
2. Grip:
- Error: Gripping the bow too tightly can introduce tension and torque into your shot.
- Correction: Hold the bow grip with a relaxed and open hand. Use a consistent grip pressure throughout the shot.
3. Drawing Hand:
- Error: Placing your drawing hand inconsistently on your face or chin can result in varying anchor points.
- Correction: Choose anchor points that work for you, such as the corner of your mouth or the tip of your nose. Maintain the same anchor points for every shot.
4. Bow Arm:
- Error: A bent or hyperextended bow arm can lead to inconsistent shots.
- Correction: Keep your bow arm extended but not locked. A slight bend at the elbow is ideal, ensuring that your arm is in line with the arrow.
5. Bow Shoulder:
- Error: Raising the bow shoulder or collapsing it inward can affect shot consistency.
- Correction: Keep your bow shoulder down and relaxed. Maintain a straight line from your bow shoulder down your drawing arm.
6. Head Position:
- Error: Tilting your head or inconsistent head placement can lead to inconsistent aim.
- Correction: Keep your head upright and aligned with your body. Your head should be comfortably positioned, with your chin resting lightly on your chest guard or clothing.
7. Release:
- Error: Punching the trigger or releasing the string suddenly can result in flinching or target panic.
- Correction: Focus on a smooth and controlled release. Gradually increase tension in your back muscles as you execute the shot. Avoid sudden movements.
8. Follow-Through:
- Error: Dropping the bow or collapsing your form immediately after releasing the arrow can affect accuracy.
- Correction: Maintain your shooting form and follow-through after the release. Let the bowstring and bow come to rest naturally.
9. Overdrawing:
- Error: Drawing the bowstring beyond your anchor points can lead to overexertion and inconsistency.
- Correction: Draw the bowstring only to your chosen anchor points, and avoid overextension.
10. Mental Focus:
- **Error:** Lack of mental focus or concentration can result in form errors.
- **Correction:** Stay mentally engaged during your shot process. Concentrate on your form, anchor points, and aim.
11. Video Analysis:
- Record your shots on video and review the footage to identify form errors. Seek feedback from experienced archers or coaches who can provide insights and corrections.12. Professional Coaching:
- Consider working with a qualified archery coach or instructor who can identify and address form and alignment errors specific to your shooting style.13. Consistent Practice:
- Regularly practice and focus on maintaining proper form and body alignment. Muscle memory develops with consistent training.Correcting form and body alignment errors in archery requires patience and dedication. Focus on one aspect at a time, and gradually incorporate corrections into your shooting routine. Over time, your improved form will lead to greater accuracy and consistency in your archery shots.
8. Mental Preparation:
- Building focus and concentration
Building focus and concentration in archery is essential for consistently accurate and successful shooting. Maintaining mental discipline during your shots is as important as physical skill. Here are some strategies to help you improve your focus and concentration in archery:
1. Establish a Pre-Shot Routine:
- Develop a consistent pre-shot routine that includes a series of steps leading up to releasing the arrow. This routine helps you focus and prepares your mind for the shot.
2. Breathe Mindfully:
- Incorporate controlled breathing into your routine. Take a deep breath before drawing the bow, and exhale slowly as you release the arrow. Controlled breathing can help reduce anxiety and improve concentration.
3. Visualize Your Shot:
- Mentally rehearse your shot before executing it. Visualize the entire process, including your stance, draw, anchor, aim, and release. Visualizing successful shots can enhance your confidence and concentration.
4. Set Specific Goals:
- Establish clear and achievable goals for your archery practice and competitions. Setting specific targets gives your mind a sense of purpose and helps maintain focus.
5. Maintain a Clear Mind:
- Clear your mind of distractions before you begin shooting. If you’re feeling anxious or stressed, take a moment to center yourself and let go of external concerns.
6. Concentrate on the Process:
- Focus on the step-by-step process of your shot rather than the end result. Concentrate on your form, anchor points, and aiming technique. Trust that the results will follow proper execution.
7. Develop Mental Cues:
- Create mental cues or phrases that help you stay focused. These cues can remind you of specific aspects of your shot process or key points of your form.
8. Stay in the Present:
- Avoid thinking about past mistakes or worrying about future shots. Stay present in the moment and focus on the arrow you’re about to shoot.
9. Manage Anxiety and Pressure:
- Learn techniques for managing anxiety and pressure, such as progressive muscle relaxation, meditation, or positive self-talk.
10. Practice Mindfulness:
- Engage in mindfulness exercises to enhance your concentration. Mindfulness meditation can improve your ability to stay in the present moment and reduce distractions.11. Stay Relaxed:
- Tension in your muscles can affect both your physical form and your mental focus. Practice relaxation techniques to keep your body and mind calm.12. Limit External Distractions:
- Choose a practice environment with minimal distractions. Turn off your phone or place it out of- Managing competition nerves.
Managing competition nerves in archery is essential for performing at your best when the pressure is on. Nervousness and anxiety are common in competitive situations, but with the right strategies, you can stay calm and focused. Here are some tips for managing competition nerves in archery:
1. Preparation Is Key:
- Thoroughly prepare for your competitions through consistent and structured practice. When you know you’ve put in the work, it can boost your confidence and reduce anxiety.
2. Develop a Routine:
- Establish a pre-competition routine that you follow for each event. Having a familiar routine can create a sense of control and calmness.
3. Visualization:
- Practice mental visualization by imagining yourself shooting successfully in a competition setting. This can help build confidence and reduce anxiety.
4. Breathing Techniques:
- Use deep, controlled breathing techniques to calm your nerves. Inhale deeply and exhale slowly to help relax your body and mind.
5. Focus on the Process:
- Concentrate on your shot process and follow your routine. Shift your attention away from the outcome and onto the steps you need to take for each shot.
6. Positive Self-Talk:
- Replace negative thoughts with positive affirmations. Remind yourself of your abilities and past successes.
7. Manage Expectations:
- Set realistic expectations for yourself. Understand that not every shot will be perfect, and that’s okay. Focus on consistency rather than perfection.
8. Embrace Nervous Energy:
- Accept that feeling nervous is natural and can be beneficial. Use that nervous energy to enhance your focus and performance.
9. Stay in the Present:
- Avoid thinking about past mistakes or future outcomes. Stay in the present moment and concentrate on the current shot.
10. Visualization of Success:
- Before your competition, visualize yourself succeeding. Imagine your arrows hitting the center of the target consistently. This positive mental imagery can boost your confidence.11. Stay Hydrated and Nourished:
- Proper nutrition and hydration can have a significant impact on your mental state. Ensure you're well-fueled and hydrated before and during the competition.12. Relaxation Techniques:
- Incorporate relaxation techniques, such as progressive muscle relaxation or meditation, to reduce physical tension and anxiety.13. Experience Matters:
- Recognize that nerves often decrease with experience. The more competitions you participate in, the better you'll become at managing your nerves.14. Coach or Mentor Support:
- Seek guidance and support from your coach or a mentor who has experience with competition nerves. They can provide valuable insights and strategies.15. Learn from Every Competition:
- Regardless of the outcome, view every competition as an opportunity to learn and grow. Analyze your performance afterward to identify areas for improvement.16. Enjoy the Experience:
- Remember why you started archery in the first place: for the joy and love of the sport. Embrace the experience and enjoy the challenge of competition.Managing competition nerves in archery is a skill that improves with time and practice. By implementing these strategies and staying dedicated to your training, you can become more resilient and composed during competitions, ultimately leading to improved performance.
- Visualization exercises and mental training techniques.
Visualization exercises and mental training techniques can significantly enhance your performance in archery. Mental preparation is as crucial as physical training when it comes to achieving consistency and accuracy in your shots. Here are some visualization exercises and mental training techniques specific to archery:
1. Visualization of Successful Shots:
- Close your eyes and vividly imagine yourself executing the perfect shot. Visualize every detail, from your stance and draw to your anchor point and release. See the arrow hitting the center of the target.
2. Pre-Shot Routine Visualization:
- Mentally rehearse your pre-shot routine. Imagine going through each step systematically, from setting up at the shooting line to releasing the arrow. Focus on the sensations and feelings associated with each step.
3. Anxiety Control Visualization:
- Visualize yourself encountering stressful situations in a competition, such as windy conditions or a tight match. Imagine staying calm and composed, focusing on your form and technique despite external distractions.
4. Mindfulness Meditation:
- Practice mindfulness meditation to improve your concentration and awareness. This involves staying present in the moment, acknowledging your thoughts and feelings without judgment, and bringing your focus back to your breath or a specific point of attention.
5. Positive Self-Talk:
- Replace negative thoughts with positive affirmations. Develop a list of positive statements about your abilities and repeat them to yourself before and during a competition.
6. Mental Rehearsal:
- Mentally rehearse entire competitions in your mind. Visualize yourself moving through the event, handling different scenarios, and successfully executing shots. This helps build mental confidence.
7. Deep Breathing Techniques:
- Practice deep breathing exercises to calm your nerves and improve focus. Inhale deeply through your nose, hold for a few seconds, and exhale slowly through your mouth. This can be particularly helpful before and during shots.
8. Progressive Muscle Relaxation:
- Progressively relax and release tension in your muscles. Start from your toes and work your way up to your head, consciously relaxing each muscle group. This can help reduce physical tension and anxiety.
9. Create Mental Cues:
- Develop mental cues or keywords that remind you of specific aspects of your shot process or form. Use these cues to stay focused during your shots.
10. Goal Setting:
- Set clear and specific goals for your archery performance. Visualize achieving these goals and focus on the process required to reach them.11. Stay Present:
- Stay in the present moment during your shots. Focus solely on the step you're currently performing, whether it's drawing, anchoring, or aiming. Avoid thinking about past mistakes or future results.12. Relaxation Visualization:
- Visualize yourself in a calm and relaxed state before and during a competition. Imagine your body and mind at ease, free from tension and anxiety.13. Visualization Journal:
- Keep a visualization journal to record your mental training exercises and experiences. Reflect on what works best for you and track your progress.14. Seek Professional Guidance:
- Consider working with a sports psychologist or mental coach who specializes in archery. They can provide personalized mental training strategies and support.Incorporating these visualization exercises and mental training techniques into your archery routine can help you improve focus, reduce anxiety, and enhance overall performance. Remember that mental training is an ongoing process, so practice regularly to reap the benefits.
9. Resources for Novice Archers:
- Recommended books, websites, and online tutorials.
As an archery beginner, you have a wealth of resources available to help you learn and improve your skills. Here are some recommended books, websites, and online tutorials for archery beginners:
Books:
- “The Ultimate Guide to Traditional Archery” by Rick Sapp: This book provides a comprehensive introduction to traditional archery, covering equipment, techniques, and tips for both beginners and experienced archers.
- “Archery Fundamentals” by Teresa Johnson: A great book for beginners, it covers the basics of archery, including equipment selection, form, and shooting techniques.
- “Precision Archery” by Steve Ruis and Claudia Stevenson: This book focuses on precision and accuracy in archery, offering valuable insights and tips for improving your shooting.
- “Archery: Steps to Success” by Kathleen Haywood and Catherine Lewis: A step-by-step guide to archery, suitable for beginners and intermediate archers, with clear explanations and drills.
Websites:
- USA Archery (usarchery.org): The official website for USA Archery, the national governing body for archery in the United States. It offers resources, news, and information about events and programs.
- World Archery (worldarchery.org): The official website for World Archery, the international governing body for the sport. It provides news, events, rules, and resources for archers of all levels.
- Archery 360 (archery360.com): A valuable online resource for archery enthusiasts, with articles, tutorials, and a directory of archery shops and ranges.
- ArcheryTalk (archerytalk.com): An online community where archery enthusiasts share advice, discuss equipment, and ask questions. It’s a great place to connect with fellow archers and learn from their experiences.
Online Tutorials and Videos:
- YouTube: YouTube is a treasure trove of archery tutorials and instructional videos. Search for channels like “NUSensei,” “World Archery,” and “Archery TV” for a wide range of archery-related content.
- Archery 360 YouTube Channel: Archery 360’s YouTube channel offers instructional videos on various aspects of archery, including form, shooting techniques, and equipment maintenance.
- Online Archery Courses: Websites like Udemy and Coursera often offer online archery courses, which can be a great way to learn at your own pace with structured lessons.
- Local Archery Clubs and Instructors: Check with local archery clubs and instructors, as many of them offer online lessons and tutorials for beginners.
Remember that while online resources are valuable, nothing beats hands-on practice and instruction. If possible, consider taking lessons from a certified archery instructor at a local range or club. They can provide personalized guidance and feedback to accelerate your learning process.
- Local archery clubs and training opportunities.
Finding local archery clubs and training opportunities is a great way to enhance your archery skills and connect with the archery community. Here’s how you can locate clubs and training programs in your area:
1. Archery Retailers and Pro Shops:
- Visit or contact local archery retailers and pro shops. They often have information about nearby archery clubs and training sessions. Plus, you can shop for equipment and get advice from experienced archers.
2. Online Directories:
- Utilize online directories and websites dedicated to archery club listings. Websites like USA Archery (for the United States) and Archery GB (for the United Kingdom) maintain directories of affiliated clubs.
3. Social Media and Forums:
- Join archery-related groups on social media platforms like Facebook or archery forums. These communities are a valuable source of information, and members can point you in the right direction for local clubs and training opportunities.
4. Local Sports and Recreation Departments:
- Contact your local sports and recreation department or community center. They may offer archery programs or have information about nearby clubs that use their facilities.
5. Universities and Colleges:
- If you are a student, check with your university or college for archery clubs or intramural programs. Many educational institutions have archery clubs open to students and the public.
6. National Archery Organizations:
- Check with national archery organizations in your country, such as USA Archery, Archery Canada, or Archery Australia. They often have resources to help you find local clubs and events.
7. Ask at Archery Ranges:
- Visit local archery ranges and inquire about nearby clubs and training opportunities. Range staff and regular patrons can provide insights and recommendations.
8. Attend Archery Events:
- Attend archery competitions, tournaments, or open houses in your area. These events are excellent opportunities to meet local archers, network, and discover club affiliations.
9. Join a Local League:
- Some areas host archery leagues or competitions, which can serve as an entry point to the local archery community. Participating in a league can also help you make connections and learn from experienced archers.
10. Contact National Governing Bodies:
- Reach out to your country's national governing body for archery (e.g., USA Archery, Archery Canada, or Archery Australia). They can provide information about affiliated clubs and events in your region.11. Search Online:
- Conduct online searches using keywords like "archery club near me" or "archery training in [your city or region]." This can yield local results and contact information for clubs and instructors.12. Check Community Bulletin Boards:
- Look for flyers or announcements about archery clubs and training opportunities on community bulletin boards in places like gyms, libraries, or local businesses.Once you’ve identified local archery clubs or training programs, reach out to them for more information about membership, training schedules, and any fees involved. Joining a club or taking part in organized training sessions can be a rewarding way to improve your archery skills and become part of a supportive archery community.
- Engaging with the archery community.
Engaging with the archery community can be a rewarding experience, whether you’re a beginner looking to learn or an experienced archer seeking camaraderie. Here are some ways to get involved and connect with the archery community:
1. Join a Local Archery Club:
- One of the best ways to engage with the archery community is by joining a local archery club. Clubs often host regular events, practice sessions, and competitions. You’ll have the opportunity to meet fellow archers, share experiences, and learn from one another.
2. Attend Archery Competitions:
- Attend local, regional, or national archery competitions as a spectator or participant. Competitions provide an excellent chance to connect with serious archers, observe different shooting styles, and gain inspiration for your own archery journey.
3. Participate in Archery Leagues:
- Many areas have archery leagues that offer both recreational and competitive opportunities. Joining a league allows you to meet other archers, track your progress, and enjoy regular archery sessions.
4. Volunteer or Coach:
- Consider becoming a volunteer or coach for an archery club or youth program. Sharing your knowledge and passion for archery with others can be highly rewarding and a great way to give back to the community.
5. Attend Workshops and Clinics:
- Look for archery workshops and clinics in your area. These events often feature experienced coaches or guest instructors who can help you improve your skills. They’re also a fantastic way to meet like-minded individuals.
6. Join Archery Forums and Social Media Groups:
- Participate in online archery forums and social media groups. These platforms provide a space to discuss archery topics, ask questions, and connect with archers from around the world. Remember to follow proper etiquette and be respectful in online discussions.
7. Subscribe to Archery Magazines and Websites:
- Stay informed about the latest developments in archery by subscribing to archery magazines or following reputable archery websites. Many of these platforms also have forums or communities where you can engage with fellow enthusiasts.
8. Host Archery Events:
- Consider organizing archery events, such as charity shoots or fun competitions, in your local community. This can help you meet new people and promote archery as a recreational sport.
9. Attend Archery Expos and Trade Shows:
- Look for archery expos and trade shows in your region. These events often feature equipment demonstrations, seminars, and opportunities to interact with industry professionals and fellow archers.
10. Collaborate on Archery Projects:
- Explore opportunities to collaborate with other archers on archery-related projects. This could involve creating instructional videos, contributing to archery publications, or participating in archery-related initiatives.11. Support Junior Archers:
- Offer support and mentorship to junior archers who are just starting their journey in the sport. Sharing your knowledge and encouraging young archers can help nurture the next generation of archery enthusiasts.12. Attend Archery Workshops and Camps:
- Enroll in archery workshops, camps, or specialized training programs. These experiences provide intensive learning opportunities and a chance to bond with fellow participants.Remember that building connections in the archery community takes time, so be patient and approach each interaction with enthusiasm and a willingness to learn. Whether you’re a novice or a seasoned archer, engaging with the archery community can enhance your skills, broaden your horizons, and create lasting friendships.
Target archery offers an engaging and rewarding experience for novices looking to delve into the world of precision shooting. By following the tips and techniques outlined in this guide, you’ll lay a solid foundation for your target archery journey. Remember, practice and patience are key to improving your skills. So grab your bow, take aim, and let the arrows fly on your path to becoming a skilled target archer!
Ready to practice? Check out our paper targets in the shop.
Browse archery bows, arrows, and accessories at the Archery Supplier shop →